Contact Details
Comprehensive guide to managing individual contact profiles, interactions, and relationships
Overview
The Contact Details page provides a comprehensive view of individual contacts, allowing you to manage all aspects of your relationship with clients, leads, and business partners. This centralized hub contains contact information, communication history, associated deals, documents, and much more.
Page Layout
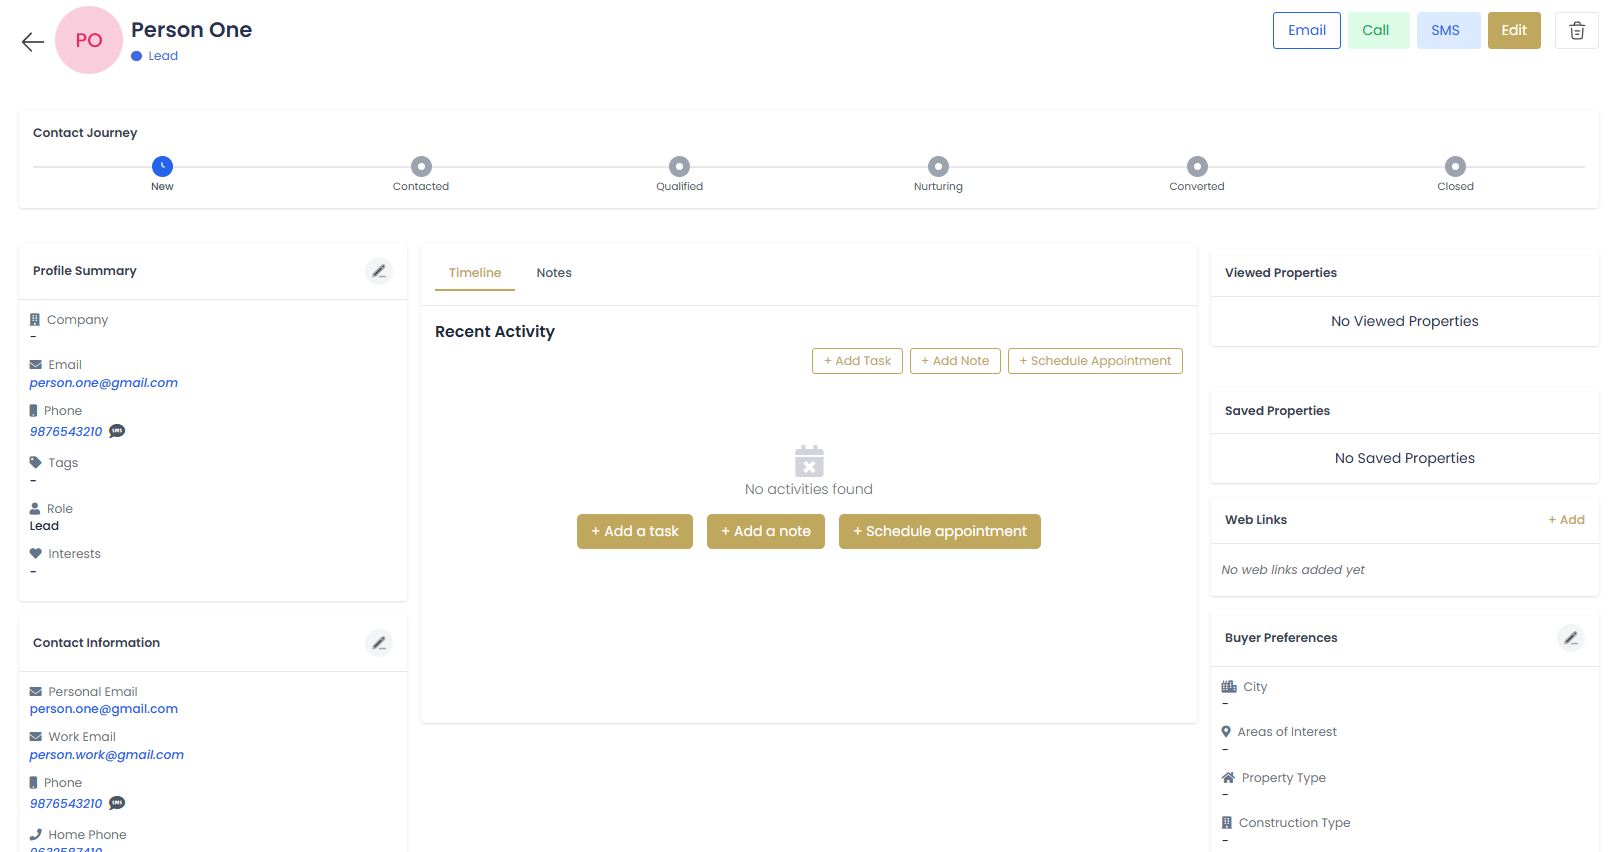
The contact details page is organized into several key sections:
- Header Section: Contact photo, name, and quick action buttons
- Contact Information: Personal and business details
- Timeline: Chronological view of all interactions
- Associated Deals: Current and past real estate transactions
- Documents: Stored files and attachments
- Notes: Personal notes and observations
Contact Information Management
Basic Information Section
View Contact Profile
The header displays the contact's photo (or initials), full name, primary email, and phone number for quick reference.
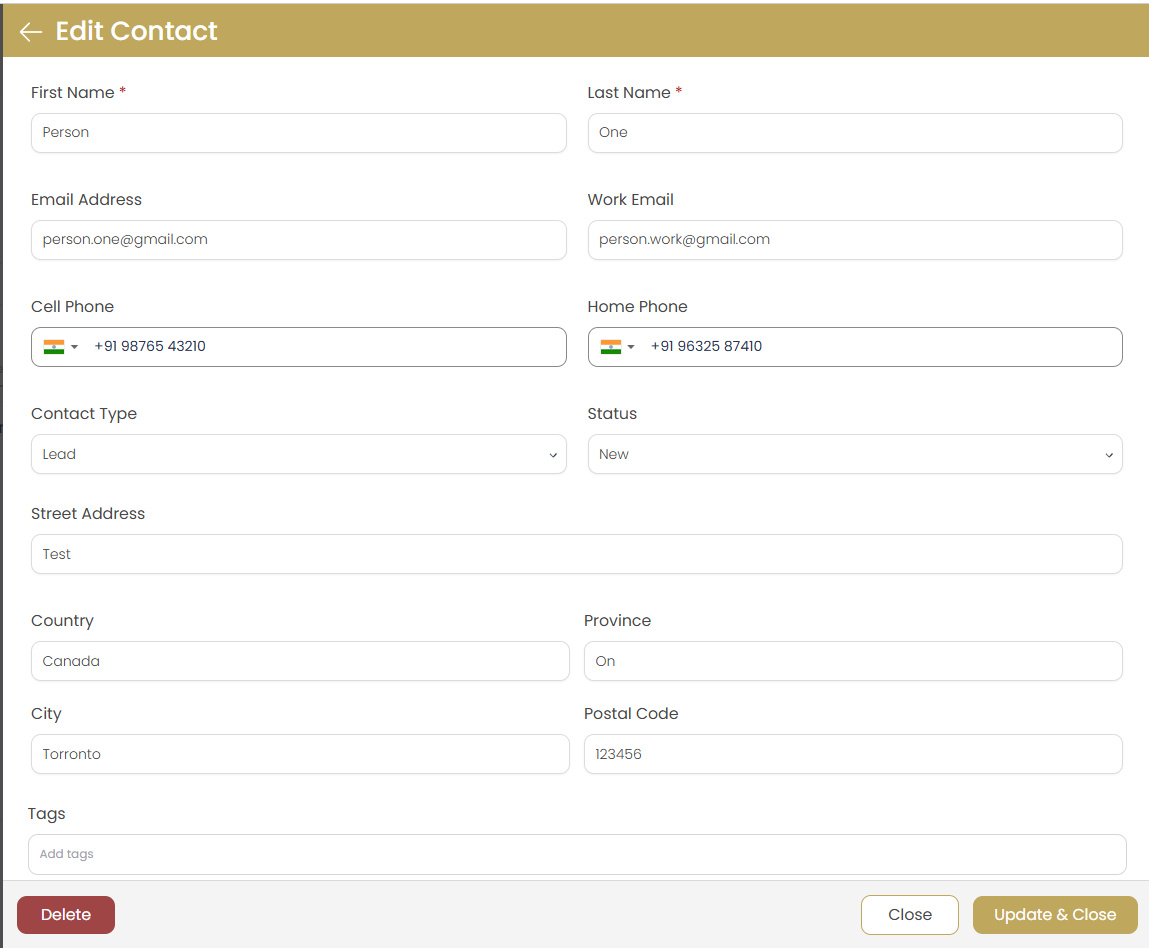
Edit Contact Information
Click the button to modify contact details:
- Personal information (name, email, phone)
- Address and location details
- Contact preferences and communication settings
- Tags and categorization
Update Contact Photo
Click on the contact photo area to upload a new profile picture or remove the existing one.
Communication Timeline
Activity Timeline Features
The timeline section provides a chronological view of all interactions with the contact:
| Activity Type | Description | Automatic/Manual |
|---|---|---|
| Sent and received email communications | Automatic when using integrated email | |
| Phone Calls | Incoming and outgoing phone conversations | Manual entry required |
| Meetings | In-person and virtual meetings | Automatic from calendar integration |
| Property Views | Website property viewing activity | Automatic tracking |
| Document Sharing | Files sent or received | Automatic when using system |
| Deal Activities | Deal creation, updates, and milestones | Automatic from deal management |
Adding Manual Activities
Click Add Activity
Use the button in the timeline section.
Select Activity Type
Choose from available activity types: Call, Email, Meeting, Note, or Custom activity.
Enter Activity Details
Fill in the activity form:
- Date and time of the interaction
- Activity subject or title
- Detailed description or notes
- Outcome or follow-up required
Save Activity
Click to add it to the timeline.
Associated Deals
Viewing Contact's Deals
The deals section shows all real estate transactions associated with this contact:
- Active Deals: Currently in progress transactions
- Completed Deals: Successfully closed transactions
- Cancelled Deals: Deals that did not complete
- Deal Role: Whether contact is buyer, seller, or other party
Creating New Deals
Click Create Deal
Use the button in the deals section.
Select Deal Type
Choose between buyer transaction, seller transaction, or rental deal.
Enter Deal Information
Fill in basic deal details and property information.
Assign Contact Role
Specify the contact's role in the transaction (primary client, co-buyer, etc.).

Document Management
Contact Documents
Store and organize all documents related to the contact:
- Identity Documents: Driver's license, passport copies
- Financial Documents: Pre-approval letters, bank statements
- Contracts: Purchase agreements, listing contracts
- Correspondence: Important email attachments
- Property Information: Listing sheets, inspection reports
Uploading Documents
Access Documents Section
Navigate to the "Documents" tab on the contact details page.
Upload New Document
Click or drag and drop files.
Categorize Document
Select document category and add relevant tags for easy retrieval.
Add Description
Provide a clear description of the document contents and purpose.
Security and Privacy
- All documents are encrypted and securely stored
- Access logs track who views or downloads documents
- Set expiration dates for sensitive documents
- Control sharing permissions for each document
Notes and Observations
Personal Notes System
The notes section allows you to record important observations and personal details about your contacts:
Types of Notes to Keep
- Personal Preferences: Preferred communication times, methods
- Family Information: Spouse name, children, pets
- Professional Details: Job, company, career goals
- Property Preferences: Desired features, locations, budget
- Important Dates: Birthdays, anniversaries, key milestones
- Relationship Details: How you met, referral source
Adding and Managing Notes
Create New Note
Click in the notes section.
Choose Note Type
Select from categories like Personal, Business, Property Preferences, or General.
Write Note Content
Add detailed information that will help you serve the contact better in future interactions.
Set Privacy Level
Mark notes as private (visible only to you) or shared (visible to team members).
Quick Actions
Communication Quick Actions
The contact header provides quick access to common actions:
| Action | Button | Description |
|---|---|---|
| Send Email | Open email composer to send message | |
| Make Call | Initiate phone call (if integrated) | |
| Send Text | Send SMS message (if enabled) | |
| Schedule Meeting | Create calendar appointment | |
| Create Deal | Start new real estate transaction |
Social Media Integration
Social Media Links
Connect with contacts through their social media profiles:
Add Social Media Links
In the contact edit form, add URLs for LinkedIn, Facebook, Twitter, Instagram, and other platforms.
View Social Profiles
Social media icons appear in the contact header, allowing quick access to profiles.
Track Social Interactions
Manually log important social media interactions in the activity timeline.
Social Media Best Practices
- Connect on LinkedIn for professional networking
- Follow company pages to stay updated on client businesses
- Engage appropriately with personal social media posts
- Use social media insights for better client service
Contact Relationships
Managing Related Contacts
Track relationships between contacts to better understand your client network:
- Family Relationships: Spouse, children, parents
- Business Relationships: Colleagues, business partners
- Referral Relationships: Who referred whom
- Professional Relationships: Lawyers, lenders, inspectors
Adding Relationships
Access Relationships Section
Find the "Relationships" section on the contact details page.
Add Related Contact
Click to connect contacts.
Select Contact and Relationship Type
Choose the related contact from your database and specify the relationship type.
Confirm Relationship
Save the relationship to create bidirectional links between contacts.
Best Practices
Contact Profile Optimization
- Complete Profiles: Fill in all relevant contact information
- Regular Updates: Keep information current and accurate
- Photo Management: Use professional photos when appropriate
- Consistent Tagging: Apply tags systematically for easy searching
Activity Tracking
- Real-time Updates: Log activities immediately after interactions
- Detailed Notes: Include specific details about conversations and outcomes
- Follow-up Actions: Note required follow-up actions and deadlines
- Outcome Recording: Document results of each interaction
Document Organization
- Clear Naming: Use descriptive filenames and document titles
- Proper Categorization: Organize documents by type and purpose
- Version Control: Keep track of document versions and updates
- Security Awareness: Protect sensitive documents with appropriate permissions
Troubleshooting
Cannot Edit Contact Information
Cause: Insufficient permissions or contact is locked.
Solution: Check your user permissions or contact an administrator. Some contacts may be protected from editing.
Documents Won't Upload
Cause: File size too large or unsupported format.
Solution: Check file size limits (usually 10MB max) and ensure supported file formats (PDF, DOC, JPG, etc.).
Timeline Activities Missing
Cause: Email integration not configured or manual activities not logged.
Solution: Check integration settings and ensure manual activities are being properly recorded.