User Management
Comprehensive guide to managing users, roles, and departments in your Agent Teammate workspace
Overview
The User Management system in Agent Teammate provides complete control over your workspace's organizational structure. Manage users, assign roles, create departments, and control access permissions through three main sections: Users, Roles, and Departments.
Administrator Access Required
User management functions require administrator privileges. Only users with administrator roles can add, edit, or remove users, roles, and departments.
- Add and manage user accounts
- Create and assign roles with specific permissions
- Organize users into departments
- Control application access and licensing
Managing Users
The Users tab is your central hub for managing all team members in your workspace. View, add, edit, and control user access from this comprehensive interface.
Adding New Users
Access User Management
Navigate to Workspace Admin in the sidebar and ensure you're on the Users tab.
Click Add Users
Click the button in the top-right corner of the interface.
Enter User Details
Complete the user information form:
- First Name: User's given name
- Last Name: User's family name
- Email: Professional email address (used for login)
- Role: Select from available roles (USER, ADMINISTRATOR, etc.)
Configure Access Settings
Set additional user properties:
- Department: Assign to organizational unit (if departments exist)
- Reporting To: Set manager relationship
- Apps Access: Control which applications the user can access
- Status: Set account as Active or Disabled
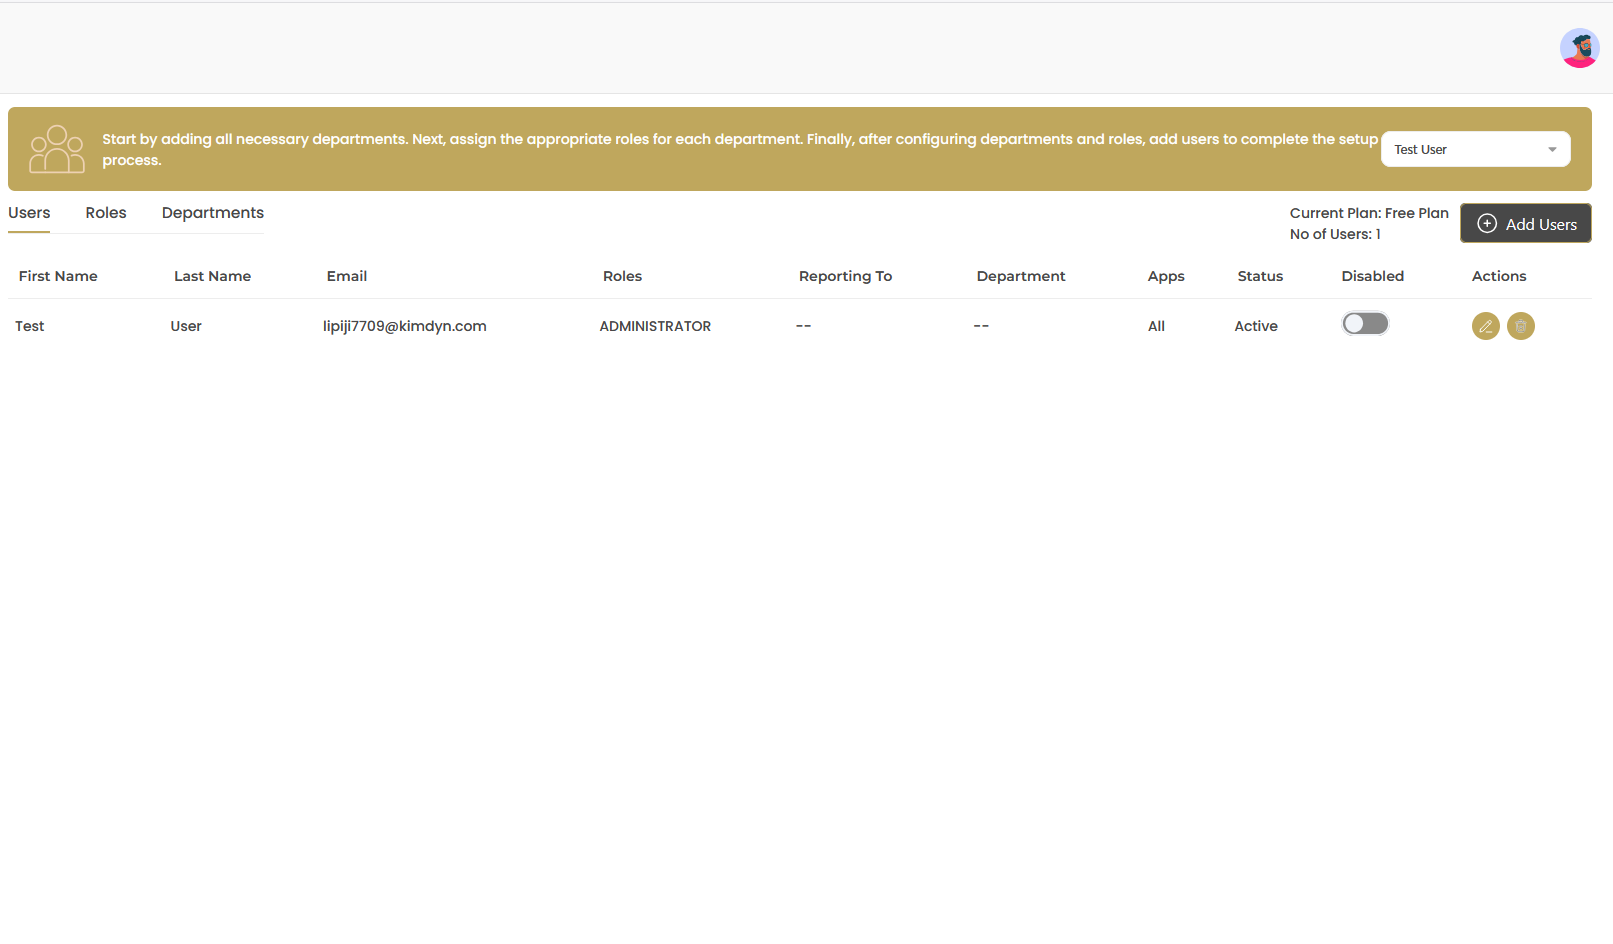
User Table Overview
The user table displays all workspace members with the following information:
| Column | Description | Details |
|---|---|---|
| First Name | User's given name | Displayed name in the workspace interface |
| Last Name | User's family name | Combined with first name for full identification |
| Primary contact and login email | Used for authentication and system notifications | |
| Roles | Assigned access level | Determines permissions and application access |
| Reporting To | Manager or supervisor | Establishes organizational hierarchy |
| Department | Organizational unit assignment | Groups users by business function or team |
| Apps | Application access permissions | Shows which apps user can access (All, CRM, Website, etc.) |
| Status | Account state indicator | Active (enabled) or Disabled account status |
| Disabled | Quick toggle control | Toggle switch to enable/disable user accounts |
| Actions | Management controls | Edit user details, reset password, remove user |
User Management Tips
- Plan Monitoring: Keep track of your current plan (Free Plan shown) and user limits
- Status Toggle: Use the Disabled toggle to temporarily suspend user access without deleting accounts
- Email Verification: Ensure email addresses are accurate for proper system notifications
- Role Assignment: Assign the minimum required role for each user's job function
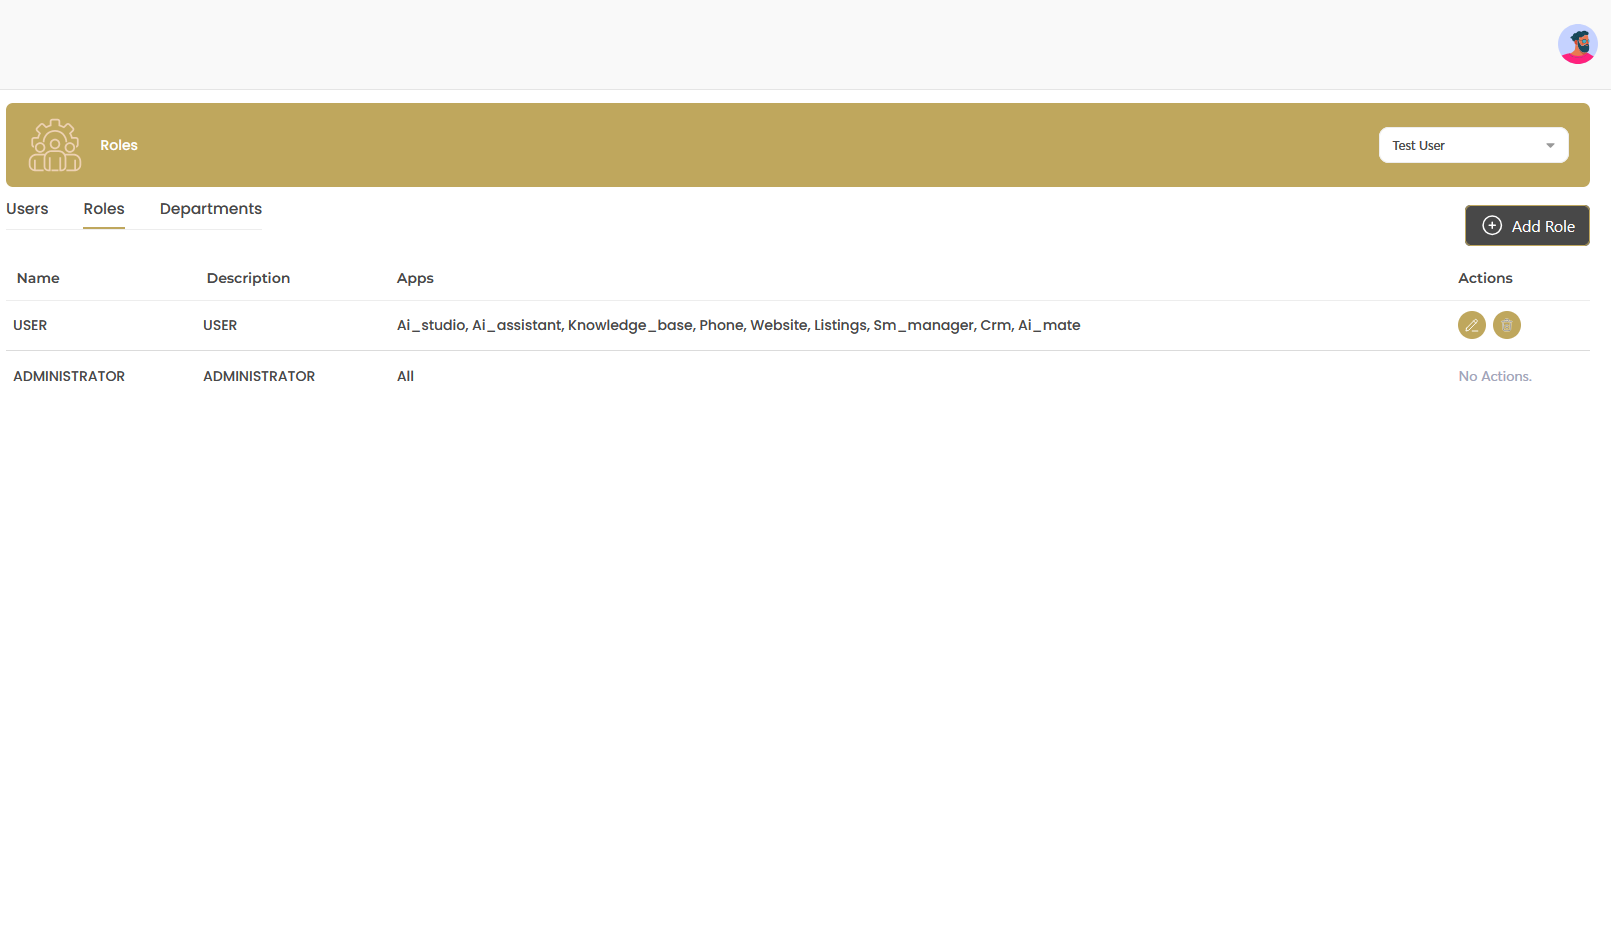
Managing Roles
Roles define what users can access and do within your workspace. Create custom roles or use predefined ones to control permissions and application access.
Understanding Default Roles
Agent Teammate comes with built-in roles that cover most organizational needs:
| Role Name | Description | Default App Access |
|---|---|---|
| USER | Standard workspace user | AI_studio, AI_assistant, Knowledge_base, Phone, Website, Listings, Sm_manager, Crm, AI_mate |
| ADMINISTRATOR | Full workspace control | All applications and administrative functions |
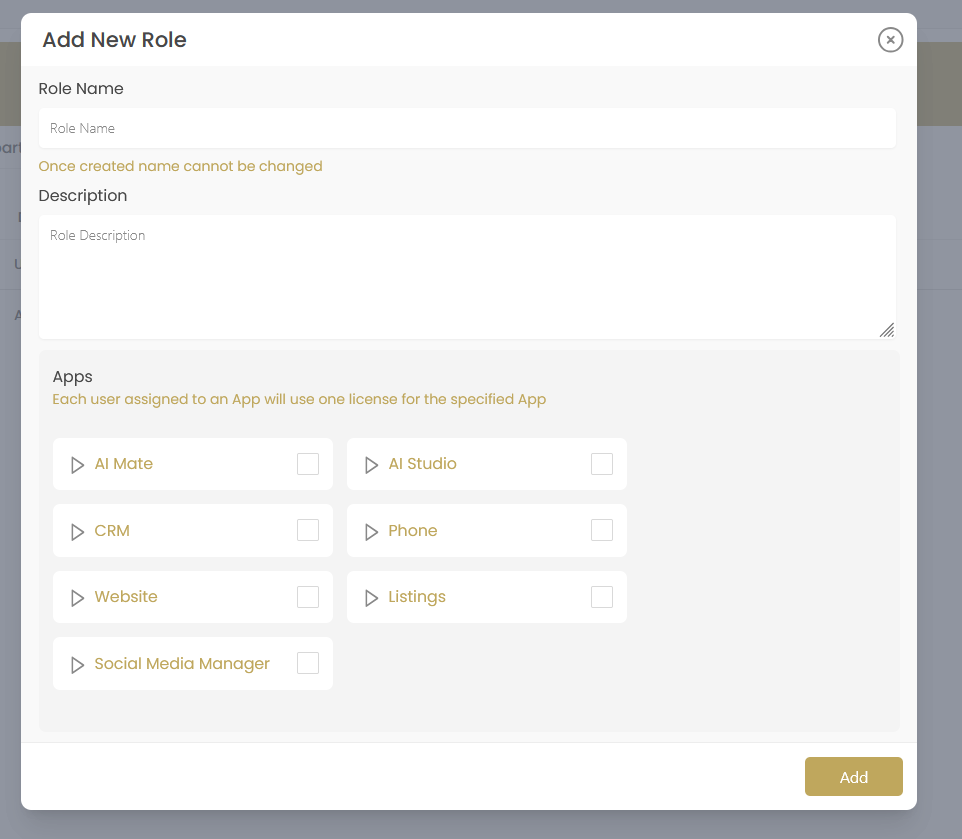
Creating Custom Roles
Access Roles Tab
Navigate to the Roles tab in the User Management section.
Click Add Role
Click the button to open the role creation dialog.
Configure Role Details
Fill in the role information:
- Role Name: Unique identifier for the role
- Description: Detailed explanation of the role's purpose
Select Application Access
Choose which applications users with this role can access:
- AI Mate: AI assistant and automation features
- AI Studio: Advanced AI content creation tools
- CRM: Customer relationship management system
- Phone: Communication and calling features
- Website: Website management and editing tools
- Listings: Property and listing management
- Social Media Manager: Social media publishing and management
Save the Role
Click to create the new role and make it available for user assignment.
Role Assignment Notes
- License Usage: Each user assigned to an app will use one license for that specific app
- Permission Inheritance: Users inherit all permissions associated with their assigned role
- Multiple Roles: Users can only have one role at a time
- Role Modification: Changes to role permissions affect all users assigned to that role
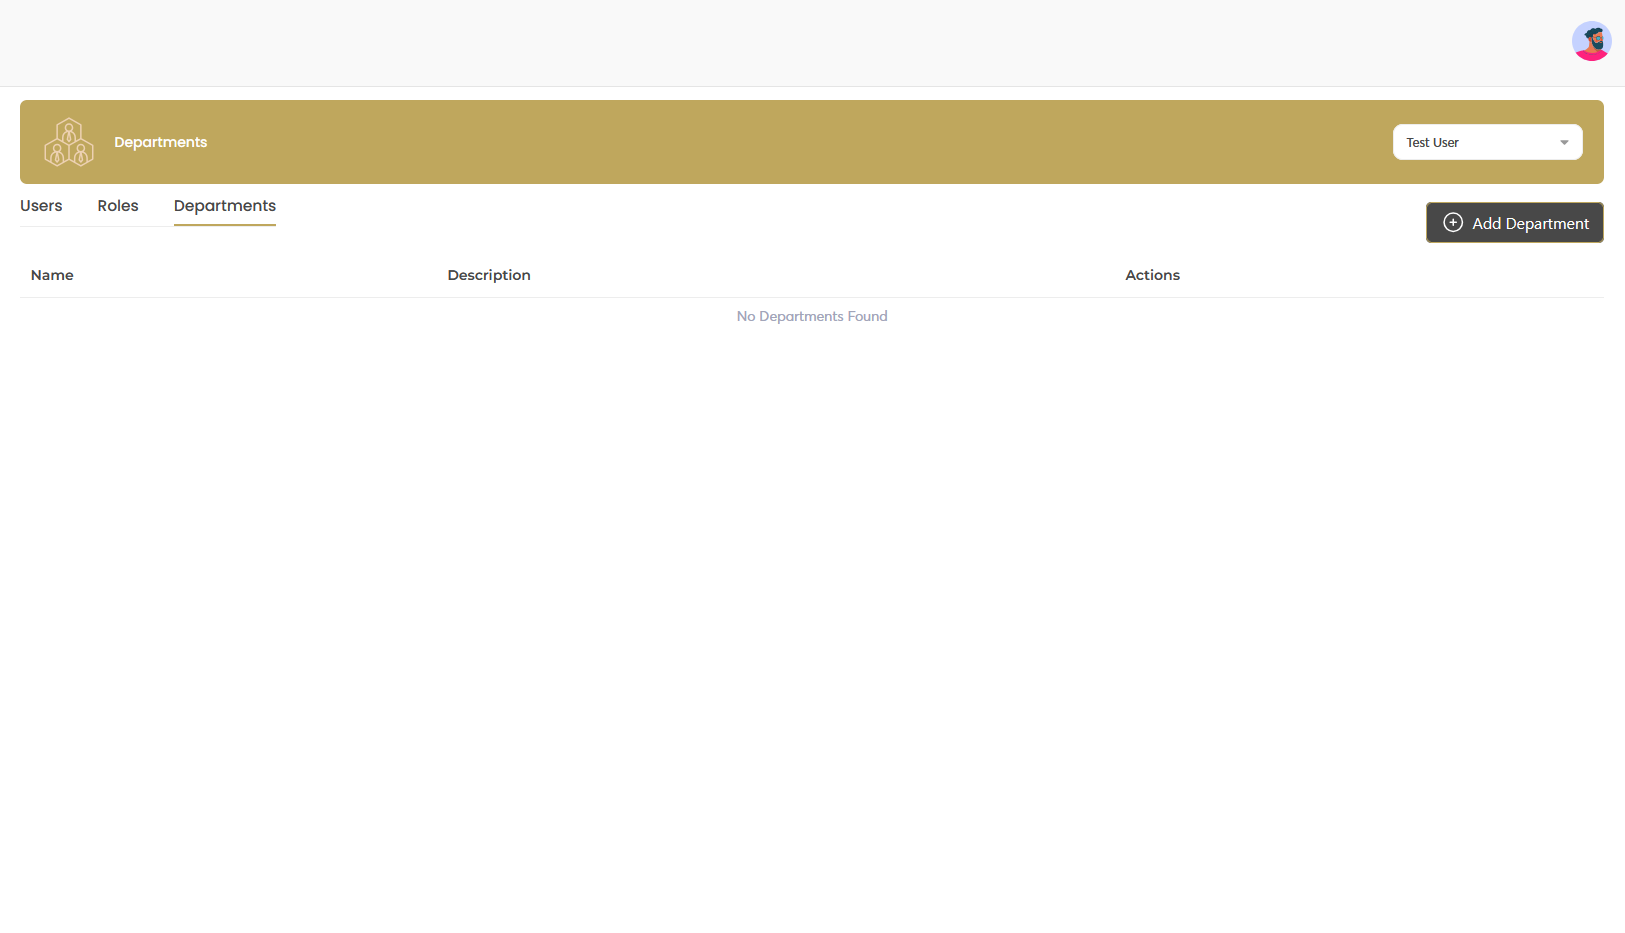
Managing Departments
Departments help organize users into logical business units, creating clear reporting structures and streamlined management processes.
Creating Departments
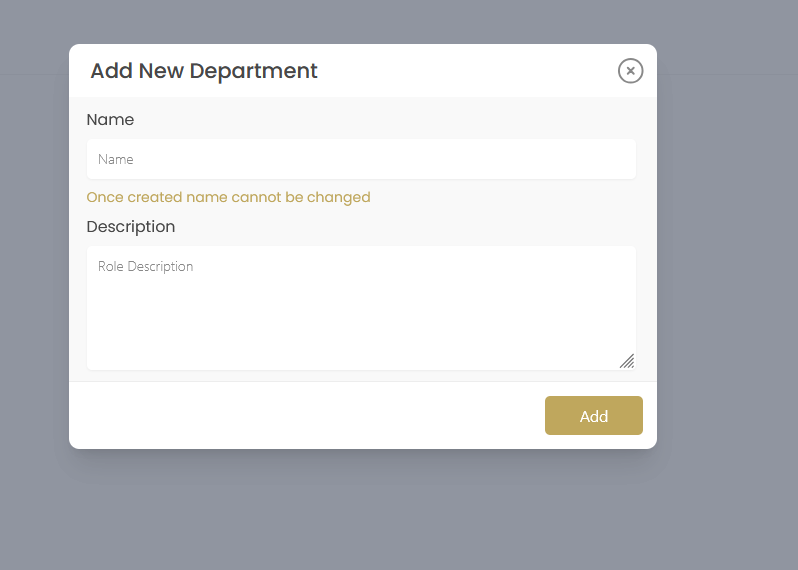
Access Departments Tab
Navigate to the Departments tab in the User Management section.
Click Add Department
Click the button to open the department creation dialog.
Enter Department Information
Provide the department details:
- Name: Department identifier (cannot be changed after creation)
- Description: Detailed explanation of the department's function and purpose
Save the Department
Click to create the department and make it available for user assignment.
Department Structure Best Practices
Organizational Structure Guidelines
- Business Alignment: Create departments that reflect your actual business structure
- Common Departments: Sales, Marketing, Operations, Customer Service, Administration
- Size Consideration: Keep departments manageable (5-15 people typically work well)
- Clear Naming: Use descriptive names that are easily understood by all users
- Future Planning: Consider how departments might grow or change over time
Advanced User Management
User Status Management
Control user access with status toggles and account state management:
| Status | Description | User Impact |
|---|---|---|
| Active | User account fully functional | Complete access to assigned applications and features |
| Disabled | User account temporarily suspended | Login blocked, data preserved, can be reactivated |
Bulk User Operations
Managing Multiple Users
- Role Changes: Update multiple users' roles simultaneously by modifying the role itself
- Department Transfers: Move users between departments as organizational needs change
- Status Updates: Quickly enable or disable multiple accounts during transitions
- App Access: Grant or revoke application access for groups of users
Troubleshooting Common Issues
User Management Problems
| Issue | Possible Cause | Solution |
|---|---|---|
| User cannot log in | Account disabled or email incorrect | Check user status toggle and verify email address |
| User missing applications | Role doesn't include app access | Check role permissions or assign different role |
| Cannot create new role | Role name already exists | Choose a unique role name (names cannot be changed) |
| Department not appearing | Department creation failed | Refresh page and try creating department again |
| User invitation not received | Email in spam or incorrect address | Verify email address and check spam folder |
User Management Analytics
Monitor your workspace user activity and optimize your organizational structure:
Key Metrics to Track
- User Count: Total active users vs. plan limits
- Role Distribution: How users are distributed across roles
- Department Size: User count in each department
- App Usage: Which applications are most/least used
- Login Activity: User engagement and activity patterns